
Wednesday, October 10, 2012

Tuesday, October 9, 2012
Surveys
If you've been to the MMC, you know that we have the little "I visited the Multimedia Center" papers for the students...so they can share the center they worked in and what they thought about it. Well, after talking with one of the teachers--who said her students had a tough time filling out the paper once they returned to the classroom--I started to think about a different way we could do it. What I really wanted was a way that we could do it electronically (maybe with an app?)...so we could have the kids complete it before they left the center. I also wanted to create a survey for the staff--so I can get feedback about the activities.
So, I started looking (in between classes yesterday) for survey apps. There are lots of them, in case you were wondering. I was looking for one with specific features, though. Since I want the students to do a "survey", I needed to find one that (in addition to being *free*) allowed me to add pictures. It didn't take me as long as I thought it would to find one: Polldaddy.com. With a free account, you can create surveys, quizzes, polls, etc. Among lots of nifty other features, they offer the ability to add pictures to surveys, and they have a free app for iDevices.
I am excited to start trying this out with the kids...we'll probably start with our PreK/Head Start classes. Here are some of the nifty things you can do with this site/app:

 Now I just need to get a functioning laptop in there, and I can start working hard on the accessibility & communication stuff. I guess that'll be tomorrow's task. :)
So, I started looking (in between classes yesterday) for survey apps. There are lots of them, in case you were wondering. I was looking for one with specific features, though. Since I want the students to do a "survey", I needed to find one that (in addition to being *free*) allowed me to add pictures. It didn't take me as long as I thought it would to find one: Polldaddy.com. With a free account, you can create surveys, quizzes, polls, etc. Among lots of nifty other features, they offer the ability to add pictures to surveys, and they have a free app for iDevices.
I am excited to start trying this out with the kids...we'll probably start with our PreK/Head Start classes. Here are some of the nifty things you can do with this site/app:
- Embed the kids' survey in the SMART board activity (it's on the last page).
 |
| Screenshot from SMART Notebook - Embedded kids' survey |
- Create QR codes to put on the center signs, or blog/newsletter (that can be scanned with any phone or iDevice with a code reader--you can get them free, too; you can actually scan these images below and it'll take you to the survey...so cool!).
- Link the apps on the iDevices (iPads/iPods) to the surveys so they can be accessed right from the center.
 |
| MMC Center Survey (staff) QR code |
 |
| Center Survey (kids) QR code |


Monday, October 8, 2012
Week #3: More introductions...and a chance to choose
For those classes who come every week, we're moving right along to our 3rd center introduction: SMART™ Board Center. If you visited the media center last year, this activity (below) might look familiar to you. Since most of the teachers are familiar with the SMART™ Board, the only introduction we'll really do for this center is to show the students how to stand to the side (so they are not blocking the projector). After that brief introduction, we're going to let the students have a chance to choose (from the 3 we've talked about), and go to work in a center.
This (choosing centers) will probably take a little bit to get used to, but our first group did a really good job remembering everything they'd learned in the first two weeks (about the other centers)...so I think it'll work. :)
On a side note, I will be posting pictures directly to the blog sometimes, but I have also created a photo album that will contain all the pictures we take in the MMC. You'll see it also as a post...but you can get to it by clicking the link as well. :) Teachers, make sure you let Helen or I know if you have students who do not have permission for photographs.
For the classes who only come to see us every other week, don't fret...we'll get there.
One more thing...this week, I'm sending with teachers the *official* newsletter from the Multimedia Center to go home with students. I hope to do this monthly--for those families who might not have access to this blog, but would still like to know what's going on. Just in case I forget (or if I don't give you enough), here's the file--so you can print more. It is double-sided, so if you're printing to send home, make sure to select the double-sided print option (so we don't kill more trees than we need to).
 |
| Objectives |
 |
| Menu for the 3 activities: Creaky Old Bed, Family Member Balloon Pop, & Family Member Matching |
.jpg) |
| Students working in the Read to Me Center... |
.jpg) |
| ...and in the iListen & iLearn Center... |
.jpg) |
| ...and in the SMART™ Board Center |
For the classes who only come to see us every other week, don't fret...we'll get there.
One more thing...this week, I'm sending with teachers the *official* newsletter from the Multimedia Center to go home with students. I hope to do this monthly--for those families who might not have access to this blog, but would still like to know what's going on. Just in case I forget (or if I don't give you enough), here's the file--so you can print more. It is double-sided, so if you're printing to send home, make sure to select the double-sided print option (so we don't kill more trees than we need to).
Week #2: Still an intro for some...a 2nd center intro for others
Sorry this didn't get posted last week...I got it half-way written and didn't quite get to the posting.
We're moving right along...now in Week #2 (which, incidentally, is the B week for our classes). For the classes that come once every 2 weeks (our half-day classes), we will be following the same plan as last week; for the every week classes, we'll be moving on to the next center: the iListen & iLearn Center.
Before I get into the center activity, though...I have to share my a-ha discovery! I was thinking as I was preparing to introduce this next center that I really wished there was a way to control which apps the students were able to access on the iPads and iPods. I have specific apps I want the students to work on at different times, depending on the theme we're in...but they are SO good (better than many of the teachers, it seems) at getting out of what I want them to do, and into something they want to do. I pondered this for a moment...and thought to myself, "You know, Apple should really come up with something...especially as more of these iDevices are popping up in educational settings." And while I considered whether or not I should write a suggestion to Apple about this, I remembered I wanted to look at trying to make the app icons a bit bigger. I remembered attending a session at a Closing the Gap conference (an annual AT conference in Minneapolis, MN, for those who aren't familiar with it) awhile back that talked all about the accessibility features on the iDevices.
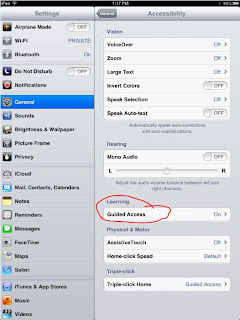
And so it was, as it usually is with me, I found--listed under "Learning" in the accessibility section of the settings--"Guided Access". 'Hmm,' I thought to myself. "Wonder what that is?" As I read the description (see the photo below), the heavens opened up and a choir of angels began to sing. Okay...so maybe it was me singing...and the light was coming from my office ceiling...but you get the idea! Hooray! I don't have to send any suggestions to Apple...it's like they read my mind. :) To see how to do this...check out the other post.
Okay...now back to business. So, this week (for those who have already made their first trip to the MMC) we are introducing another center--the iListen & iLearn Center. In this center, the students will have a chance to interact with either the iPads (using different apps, depending on the theme) or the iPod touches (listening to sounds, stories, and/or music).
This month for the iLearn part (i.e. on the iPads), the students will be using one of two math apps: Counting Ants Lite (free app; counting, number recognition),
and Pre-Number Category Sorting ($0.99; matching shapes, colors, sizes).
Since I now know how to lock the apps...that's what will happen--each iPad will be running one of the above apps, and it will be locked so the students cannot get to any other apps (or even exit this app). To do a different activity, they will need to either move to another device, or choose a different center. The adults will need to monitor this for awhile because although they cannot get out of the app by themselves, frustrated students could still throw the iPad/iPod...which, obviously, I would like to prevent. :)
In the iListen (the iPod touches), we have the teacher read-aloud stories for both themes 1 & 2, and the sounds for themes 1 & 2.
We're moving right along...now in Week #2 (which, incidentally, is the B week for our classes). For the classes that come once every 2 weeks (our half-day classes), we will be following the same plan as last week; for the every week classes, we'll be moving on to the next center: the iListen & iLearn Center.
Before I get into the center activity, though...I have to share my a-ha discovery! I was thinking as I was preparing to introduce this next center that I really wished there was a way to control which apps the students were able to access on the iPads and iPods. I have specific apps I want the students to work on at different times, depending on the theme we're in...but they are SO good (better than many of the teachers, it seems) at getting out of what I want them to do, and into something they want to do. I pondered this for a moment...and thought to myself, "You know, Apple should really come up with something...especially as more of these iDevices are popping up in educational settings." And while I considered whether or not I should write a suggestion to Apple about this, I remembered I wanted to look at trying to make the app icons a bit bigger. I remembered attending a session at a Closing the Gap conference (an annual AT conference in Minneapolis, MN, for those who aren't familiar with it) awhile back that talked all about the accessibility features on the iDevices.
And so it was, as it usually is with me, I found--listed under "Learning" in the accessibility section of the settings--"Guided Access". 'Hmm,' I thought to myself. "Wonder what that is?" As I read the description (see the photo below), the heavens opened up and a choir of angels began to sing. Okay...so maybe it was me singing...and the light was coming from my office ceiling...but you get the idea! Hooray! I don't have to send any suggestions to Apple...it's like they read my mind. :) To see how to do this...check out the other post.
 |
| Screenshot from my phone...but it looks the same and works the same on the iPads/iPod touches |
This month for the iLearn part (i.e. on the iPads), the students will be using one of two math apps: Counting Ants Lite (free app; counting, number recognition),
 |
| Counting Ants Lite (free) |
 |
| Screenshot from Counting Ants Lite |
 |
| Counting Ants Lite |
and Pre-Number Category Sorting ($0.99; matching shapes, colors, sizes).
 |
| Pre-Number Category Sorting ($0.99) |
 |
| Screenshot from Pre-Number Category Sorting |
Since I now know how to lock the apps...that's what will happen--each iPad will be running one of the above apps, and it will be locked so the students cannot get to any other apps (or even exit this app). To do a different activity, they will need to either move to another device, or choose a different center. The adults will need to monitor this for awhile because although they cannot get out of the app by themselves, frustrated students could still throw the iPad/iPod...which, obviously, I would like to prevent. :)
In the iListen (the iPod touches), we have the teacher read-aloud stories for both themes 1 & 2, and the sounds for themes 1 & 2.
Monday, October 1, 2012
Guided Access Settings
Here's how to set the guided access setting...
First, you will need to enable it in the "Settings". Go to "Settings"-->"General"
You'll need to swipe up (on the right side) to get to the bottom of the list--which is where "Accessibility" is located.
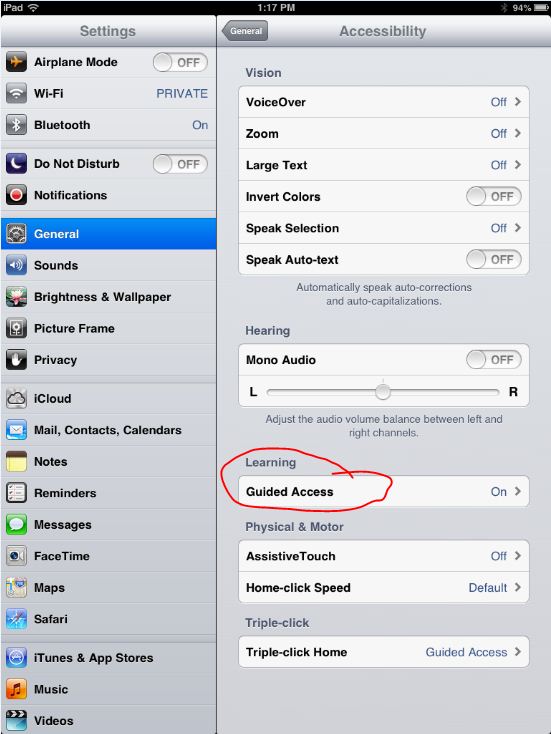
Once in the Accessibility menu, you should see 'guided access' listed under Learning. It will be "off" by default (mine is "on" in the screenshot because I'd already set it up :) ). Touch it to open the menu and turn the feature "on".
It will also open the Guided Access options...
If you really want to make sure the kids can't get out of the app, set the passcode...just make sure you remember the 4-digit code you enter, or you won't be able to get out of the app either!
Now that you've set up the feature, you can activate it from any app. To activate it, open the app and triple-click (press 3 times, quickly) the "home" button.
That will open some options...
When you have selected all the options you want, touch "Start". You will not be able to exit the app unless you de-activate it by triple-clicking the "home" button again and entering the passcode.
First, you will need to enable it in the "Settings". Go to "Settings"-->"General"
You'll need to swipe up (on the right side) to get to the bottom of the list--which is where "Accessibility" is located.
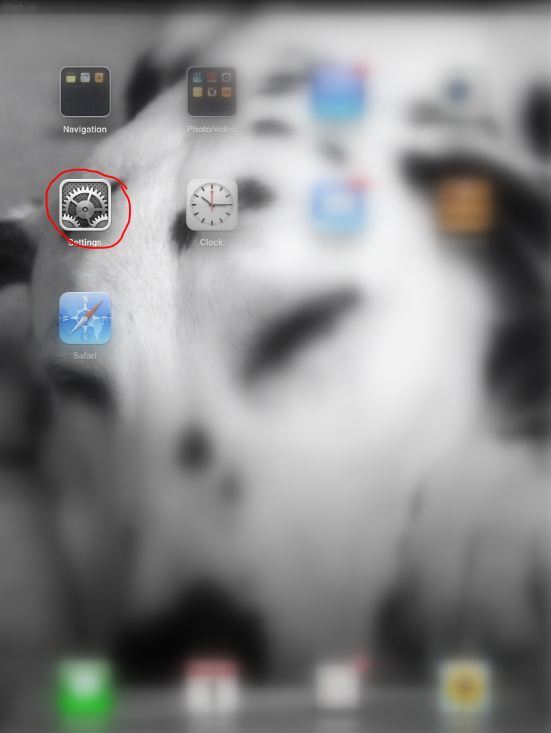 | |
| Open 'settings' |
 |
| Go to 'general' |
 | ||
| Swipe up to get to the bottom of the general settings & select 'accessibility' |
It will also open the Guided Access options...
 |
| Guided access options |
Now that you've set up the feature, you can activate it from any app. To activate it, open the app and triple-click (press 3 times, quickly) the "home" button.
 |
| Press the "Home" button (circled in red) 3 times in a row, quickly |
 |
| Guided access options, once activated in an app |
Thursday, September 27, 2012
First week of classes!
Well, we are nearing the close of our first week of classes here in our new Multimedia Center. Overall, I think it's gone pretty well.
For those of you who were not able to make it (or if you're a B-week class), we did pretty much what I said we would do in the last post...we introduced ourselves using the SMART Board,
.jpg)
we introduced the kids to the Read To Me Center, and demonstrated what to do if if that's the center you choose.
.jpg)

We also shared our "kid report" page that we'll give to each student (or to the teachers...not sure just yet of those details) at the end of each visit...so they will have something to 1-take home to tell their family about coming to the multimedia center, and 2-they can share how they felt about it.
Overall, I would say that we had a pretty good first week! We're looking forward to next week!
I did want to also share some info about our SMART Table. For those who have not heard, it is dying. Apparently, it was probably in the early stages of dying for awhile...but it was hanging on...until I tried to "orient" it, and then it became aware of its illness and stopped working. I spent a good chunk of time yesterday afternoon on the phone with the Level II technician from SMART (that's who you talk to when your problem is too big for the Level I folks) trying to "revive" our board so we could at least use it while we wait for the replacement table top. It was quite a process...as anyone who was in the library during this time can tell you. I had my phone stretched across my office, the SMART table wedged in my doorway, keyboards and mice hanging all over the place, and at one point, all the lights in the library off. The situation is this...it's "sorta" functional, but just barely. So we're going to be without the SMART table until we get the new table top. Unfortunately, there is a backlog of orders for these (we're not the only ones having this trouble)...so it may be a month or two before we are up and running with the SMART table center.
For those of you who were not able to make it (or if you're a B-week class), we did pretty much what I said we would do in the last post...we introduced ourselves using the SMART Board,
.jpg) |
| Introductions & greetings with the SMART Board |
.jpg)
we introduced the kids to the Read To Me Center, and demonstrated what to do if if that's the center you choose.
.jpg) |
| Practicing with the AnyBook reader (aka "special pen") |
.jpg)

**Note to teachers: If I forgot to give you these when you came with your class, I apologize...if you click on the link (above) you can print them.**

 |
| "I went to the Multimedia Center today!" - kid report |
I did want to also share some info about our SMART Table. For those who have not heard, it is dying. Apparently, it was probably in the early stages of dying for awhile...but it was hanging on...until I tried to "orient" it, and then it became aware of its illness and stopped working. I spent a good chunk of time yesterday afternoon on the phone with the Level II technician from SMART (that's who you talk to when your problem is too big for the Level I folks) trying to "revive" our board so we could at least use it while we wait for the replacement table top. It was quite a process...as anyone who was in the library during this time can tell you. I had my phone stretched across my office, the SMART table wedged in my doorway, keyboards and mice hanging all over the place, and at one point, all the lights in the library off. The situation is this...it's "sorta" functional, but just barely. So we're going to be without the SMART table until we get the new table top. Unfortunately, there is a backlog of orders for these (we're not the only ones having this trouble)...so it may be a month or two before we are up and running with the SMART table center.
Friday, September 21, 2012
Grand Opening...Slowly...
We're
getting all prepared for our Grand Opening on Monday! For the first few
weeks, it'll be a little different as we try to introduce the kids to
everything...especially the *new* stuff (since that's new to the
teachers and paraprofessionals, too!). We're going to start with an intro to each center...with an opportunity for the kids to practice.
So here's what to expect in the first week:
So here's what to expect in the first week:
- We will be introducing ourselves (me & Miss Helen) to the students.
- We will introduce the students to our "center management" plan (i.e. how they will choose centers)
- We will introduce students to the Read To Me Center.
You
may recognize these pictures from an earlier post...but I wanted to
include them again since they relate to the Read To Me Center.
First, for the green dotted books (which will use the iPod touches):
 | |
| Screenshot of iPod touch (from Read To Me Center) showing the "Music" icon to touch to open the books |
 |
| Screenshot of what you *should* see once you touch the "Music" icon. |
And for the red/blue dotted books, the students will use the Franklin AnyBook Readers...
 |
| Blue AnyBook reader (with corresponding blue-dotted book) |
Also, here is a shot of the Launch Pad - this is the spot where the students will be able to see which centers are open and available, take their "check-in" stick (and where they will return their sticks when finished with a center) and...
..."check-in" at the center...
Okay...well, I'm going to get prepared to get out of here for the day (since Fridays are not one of my work days). Have a great weekend and I'll see you all on Monday morning for our first day of classes!
.jpg) |
| Launch pad |
 |
| "Check-in" center sign |
Subscribe to:
Posts (Atom)