
My challenge for today has been to try to (simply) create some slideshow videos with music. I was able to locate an app (Photo Slideshow HD, $3.99) that let me do that pretty simply...but, since nothing I do can be completely simple, I also had to figure out how to create a "clip" from a piece of music--I thought a 2-3 minute video might not hold the attention of some of our kiddos. Thankfully, you can find answers to just about any problem on the internet. :) (For anyone who might be interested in how to do that, I've included the simple instructions at the bottom of this post.)
Once I created the videos, I added them to one of the SMART Table activities, AND I inserted them into a switch-accessible activity in Classroom Suite 4 (in the Computer center). I didn't create the activity...Linda Burkhart did, I just used her template and directions, and inserted my own videos. There were some issues with downloading the templates right from her site...but I sent her an email, and she sent the files to me. I don't know if she was able to get the site working...but I definitely recommend visiting it--lots of great resources.
By activating one (or two) switch/s (or directly touching the touchscreen on the computer), students can view the video (slideshow) for that particular season.
 |
| Screenshot of CS 4 switch-accessible "select/watch video" activity |
 |
| screenshot of fun bubbles app |
 |
| screenshot of heat pad app |
My next task is to get my order ready for some switches for our iPads & iPod touches...to really make our iListen/iLearn center more accessible!
We're just about finished with all of our center introductions now...so, when we return from break, we are going to start jumping right into working in all of our centers. Our (mine & Miss Helen's) roles will switch from "teaching" to "facilitating"...we will be trying to encourage language and communication while we interact with the students in the centers.
Creating a clip from a song in your iTunes library
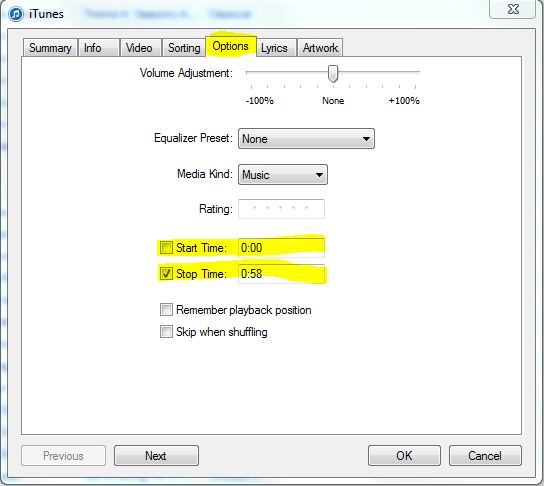
Okay, so now for the "making a clip from a song in an iTunes library" instructions. The instructions I found online were for an older version of iTunes (I realized after I started that I had just recently updated my version to 11...and that changed a whole lot of things)...so I have adapted them for iTunes 11. If you have not updated your version of iTunes, the instructions I located during my search would probably work better for you.First, locate the song in your iTunes library. I found it helpful to play the song and sort of get an idea of where I want to stop/start the song. Right-click on the song in the library and go down to "Get info".
Then click on the "Options" tab. Here's where you enter your Start & Stop time...you can change one or the other, or both. When you've done this, click "OK".
 |
| options tab |
 |
| create new version (aka saving your clip) |